Get A Quote
Sep 23,2026
Flexographic printing depends on a precisely controlled sequence of ink transfers: from the ink fountain to the anilox roll, from the anilox roll to the printing plate, and finally from the plate to the substrate. When any link in this chain fails, the result is visible on the printed sheet—weak solids, pinholing, dirty highlights, or dot bridging. Understanding how ink actually moves through the system is the first step toward diagnosing and fixing these problems. This article explains the flexo ink transfer mechanism, identifies the most common transfer failures, and provides a practical troubleshooting framework.
To explore the available options, review the flexible printing plate configurations designed for different ink systems and substrates.
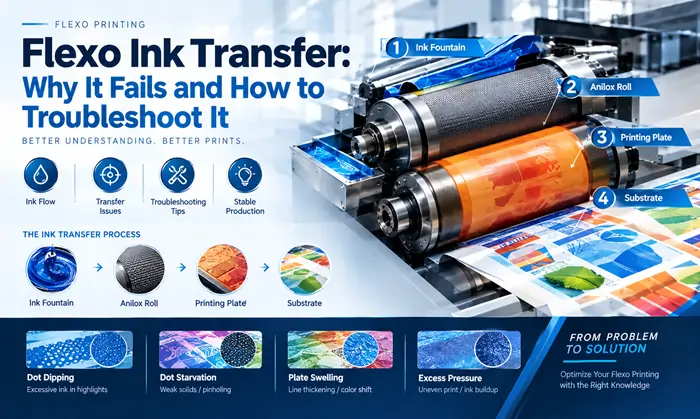
The flexo ink transfer process is often described as "kiss printing" because the contact pressure between the plate and the substrate is very low. This low pressure places strict requirements on ink formulation and system compatibility.
Ink transfer works best when there is a controlled surface-energy decrease across each interface: from the ink fountain, to the anilox roll, to the plate, and finally to the substrate. Each transfer step should show only a modest surface-energy drop—typically less than 2 mN/m on average—while maintaining at least a 1 mN/m surface-energy drop at the final ink-to-substrate interface to support reliable wetting and transfer. If the surface energy of the plate is too low, the ink may not form a continuous film, and the film may break easily.
This is why plate surface chemistry matters. Flexo plates with mismatched polarity to the ink, or plates that swell excessively in solvent, disrupt transfer uniformity and ultimately affect adhesion on the substrate.
What it looks like: Excessive ink in highlight areas. Small dots print larger or dirtier than intended. Fine lines appear smeared or flooded.
What causes it: Dot dipping occurs when the diameter of a printing plate's raised dot becomes smaller than the opening of the corresponding anilox cell. The plate dot physically intrudes into the anilox cell, picking up excess ink. That extra ink transfers to the substrate, causing smeared features or unwanted ink carry-over.
How to fix it: Match plate dot size to anilox cell geometry. For fine highlight work, select an anilox roll with smaller cells or higher line count. A commonly accepted rule is that the anilox line count should be at least 4 times the plate line screen. For stable long-run printing, some suppliers recommend a 5:1 or even 6:1 ratio. If the plate dot size and anilox cell size are properly matched, dot dipping is minimized.
What it looks like: Weak solids, low color density, incomplete coverage. Pinholing appears in solid areas. Fine reverse type fills in.
What causes it: Dot starvation is the opposite of dot dipping. It occurs when the anilox cell volume is too small relative to the plate dot size, so insufficient ink is delivered to the plate. The plate cannot pick up enough ink to transfer a full film to the substrate. This is one of the most common causes of low solid densities and pinholing in flexo printing.
How to fix it: Verify anilox volume and clean the roll if it is plugged or contaminated. A dirty anilox roll reduces effective ink volume and disrupts ink transfer performance. If cleaning does not resolve the issue, consider a higher-volume anilox roll or a plate with a textured surface that improves ink pickup. For corrugated and rough substrate applications where dot starvation often occurs, the SF-DGS Digital Versatile Flexo Plate is designed with more open intermediate depths and finer highlight dots to support consistent ink release.
What it looks like: Progressive thickening of lines and dots during the run. Registration drifts. Print quality degrades over time.
What causes it: The first thing to check in any flexo transfer problem should always be the compatibility of the plate resin and the printing ink. If the plate resin swells in the ink or solvent, lines and halftone dots become thicker, leaving dot stains and fatter lines. This is especially common with solvent-based inks, UV-cured inks, and water-based inks if the plate is not formulated for that chemistry.
How to fix it: Verify ink-to-plate compatibility before committing to a production run. Most modern flexo plates are compatible with water-based, solvent-based, and UV inks, but concentration limits apply. For example, acetate concentrations up to 10% are well-tolerated in most cases, though this can vary depending on co-solvents used. If swelling persists, switch to a plate formulated for the specific ink system.
What it looks like: Uneven printing across the sheet. Some areas print heavy, others light. Ink builds up on the plate surface over time.
What causes it: If the printer and anilox roll are applying more pressure than necessary, ink will not spread evenly across the plate surface. Excess ink remains on the plate instead of transferring cleanly to the substrate. Over multiple cycles, this excess ink builds up, causing unevenness.
How to fix it: Reset impression pressure. The goal is minimum pressure that still produces clean transfer. Excess pressure also accelerates plate wear and increases dot gain. Recent plate technologies such as flat-top halftone dots and fine line structures reduce the pressure needed for proper contact at high speeds.
| Symptom | Most Likely Transfer Failure | First Check | Corrective Action |
|---|---|---|---|
| Excessive ink in highlights, smeared fine lines | Dot dipping | Plate dot size vs. anilox cell opening | Use higher-line-count anilox; match dot size to cell |
| Weak solids, pinholing, low density | Dot starvation | Anilox volume; roll cleanliness | Clean anilox; increase volume if necessary |
| Progressive line thickening during run | Plate swelling / ink incompatibility | Plate resin–ink compatibility | Switch to compatible plate or adjust solvent blend |
| Uneven print, ink buildup on plate | Excess impression pressure | Impression settings | Reset impression to minimum |
| Fine reverse type filling in | Insufficient ink release from plate | Plate surface energy | Verify plate surface energy; check ink formulation |
Match plate and anilox before the job starts. The ratio between anilox line count and plate line screen is the single most important selection decision. Use a minimum 4:1 ratio; for critical work, 5:1 or higher.
Verify ink-to-plate compatibility. Not all plates behave the same in all ink systems. Confirm the plate resin's resistance to the specific solvent blend, acetate concentration, and ink chemistry you use.
Control ink viscosity. High viscosity causes poor flow and difficulty in transfer. Reduce viscosity by adding solvent or blended inks to achieve the proper running level.
Keep the anilox roll clean. Anilox cells become plugged with dried ink over time, reducing effective volume and disrupting transfer. Regular laser cleaning or anilox brush cleaning restores transfer efficiency.
For plate selection guidance based on your specific ink system and anilox setup, discuss your material and production requirements with the technical team.
Pinholing is most commonly caused by dot starvation—insufficient ink delivered from the anilox to the plate. A dirty or plugged anilox roll reduces effective ink volume. If cleaning does not resolve the issue, a higher-volume anilox or a plate with improved ink pickup may be needed.
Dot dipping occurs when the plate's raised dot is smaller than the opening of the anilox cell. The dot intrudes into the cell and picks up excess ink, causing smeared features, flooding, or unwanted ink carry-over in highlight areas.
A minimum ratio of 4:1 is widely recommended. For stable long-run printing, some suppliers recommend 5:1 or 6:1. For example, a 70-line plate would use a 350-line anilox at 5:1.
Plate swelling occurs when the plate resin is not fully compatible with the ink or solvent system. Solvent-based inks, UV inks, and water-based inks can all cause swelling if the plate is not formulated for that chemistry. Check acetate and ketone concentrations against plate specifications.
High viscosity causes poor flow and difficulty in transfer, leading to uneven laydown and weak coverage. Reduce viscosity by adding solvent or blended ink to reach the proper running level. Viscosity should be checked and controlled throughout the run.
Yes. If the plate's surface energy is too low relative to the ink, the ink may not form a continuous film, and the film may break during transfer. A controlled surface-energy decrease across the ink fountain, anilox, plate, and substrate supports reliable transfer.
Flexo ink transfer is a chain of precisely controlled surface interactions. When the chain is disrupted—by dot dipping, dot starvation, plate swelling, or excess pressure—the result is visible on the printed sheet. The most effective troubleshooting approach is to identify which transfer link is failing, then adjust the plate, anilox, ink, or pressure settings accordingly.
The most preventable failures are those addressed before the job starts: matching plate dot size to anilox cell geometry, verifying ink-to-plate compatibility, and controlling viscosity. These upfront checks reduce pressroom troubleshooting and keep transfer consistent from the first sheet to the last.
If you are dealing with recurring transfer problems or evaluating plate options for a demanding ink system, review the available flexible printing plate configurations and discuss your specific production requirements with the supplier. For plate care and storage guidance that supports consistent transfer, explore the service and support resources available.
Disclaimer: The information in this article is provided for general guidance only. Ink transfer performance depends on specific anilox specifications, ink chemistry, plate formulation, press conditions, and substrate characteristics. Actual results should be verified through testing on your production equipment. Buyers should confirm specifications with their supplier before placing an order.
GET A QUOTE